Buy Now
Solar Cells

SOLAR POWER FROM CDN$0.59 PER WATT!
Now you can purchase commercial solar cells in Canada in either the 5 inch or 6 inch square configuration. These high-grade mono and poly chrystalline cells are suitable for building your own megapanels to your specifications right at your own home using only a soldering iron and interconnecting ribbon.
Equipped with integrated bus bars, the cells can be arranged in a series configuration to produce the same power output commonly associated with heavy duty panels used for grid tie or independent power producing applications.
There is no minimum order quantity -
| 6" Square Single Solar Cell | 5" Square Single Solar Cell |
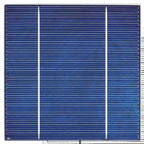
6" square [15.6 cm] polycrystalline 16.1% efficiency cells:
|
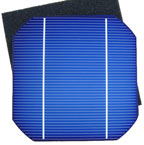
5" [12.5 cm] 16% efficiency monocrystalline cells: |
| Buy it now! | Buy it now!
|
See our DIY enthusiasts sharing their projects with you!
Assembly Instructions
For a summary of assembly instructions, follow the steps below. For precise instructions which also includes references to materials used, check our FAQ's in the next weeks for additional information as it is made available, or write to: info@green-first.com
- Select a flat, non-conductive surface where you would like to have your assembled PV panel. This can be a sheet of material which you can mount as a panel, or a flat surface which will permanently serve as a PV panel following its construction.
Note: Make sure the material does not expand if exposed to heat from the sun. Pressure-treated plywood is by far the most suitable, as is thick plexiglass.The surface should be smooth, without bumps or crevices, and able to hold 36 cells for a 12 volt system, or 72 for a 24-volt system. A centimeter of extra backing material around the perimeter is necessary to serve as the mount for shimming material upon construction of the module.
NOTE: The cells can be arranged in configurations of your choice, for instance: 36 cells can be arranged as 4 rows of 9 cells, 6 rows of 6 cells, 3 rows of 12 cells, etc.
-
Lay all 36 cells upside down and carefully solder a 1" piece of conductive ribbon to each cell bus bar (back of each cell) so that the ribbon is located in a manner facilitating connection of the other end to the adjacent cell.
NOTE: During the soldering procedure, first coat a small section of the bus bar with solder (use solder 40-60 flux core which melts at a low temperature such as 262 degrees C), then coat the strip of conductive ribbon, and then join the two solder-coated surfaces. Do not attempt to remove all of the light-absorbing coating of the bus bar as this often leads to rough cell handling and breakage.
-
Once all 36 cells (for a 12 Volt example) are soldered with the conductive ribbons on the back, flip each cell over and arrange so that they lay rightside up in the exact pattern you desire the finished product to be.
It will be beneficial to use non-conductive, non corrosive gluing material such as quality non-hardening weather caulking in spots on the backs of each cell before arranging upon the surface to guarantee they will not slide around after assembly.
Arrange the conductive ribbons so that the unsoldered end of each cell lays upon the top of the adjacent cell's bus bar. Solder this end to the top bus bar of each cell, forming a complete circuit of Positive (back of cell) to Negative (front of cell).
- Select two lengths of wire (2 - 3 meters in length) of suitable diameter to carry power from the array (18 AWG for the 12.5cm cells, 16 AWG for the 15.6 cm cells)and attach the one designated for negative to the front busbar of the end cell which has no connection, and then the remaining lead to the back of the opposite cell at the other end of the array.
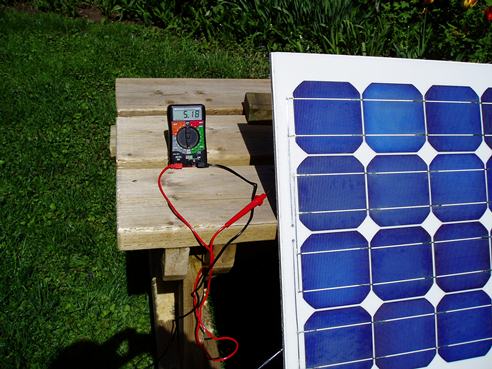
Test power output of the two lead ends to ensure you are receiving approx. 20 volts (in good natural light) and in bright sunlight there should be a sufficient current supply - using a small 12V electric motor will ensure your connections are conducting electricity.
Fabricate a shimming method around the perimeter of the panel, with a height sufficient to not permit the glass covering to put excessive pressure on the PV cells. A shimming height of 6 mm or 0.25 inches is generally adequate.
Cover cells with a glass of your choice - 1/8" plexiglas is often the easiest material to work with provided it is not allowed to become scratched. Acrylic and tempered glass is often a preferred choice for those who like to secure the glass in various methods.
Secure the power leads of the panel so as not to block cells from reaching maximum light, as well as insuring that pressure on the leads will not allow them to become disengaged from their solder points.
-
Seal the perimeter of the panel using a strong, high quality silicon based weather sealer to prevent water entry between the glass and the backing material. If a backing material was chosen which is not adequately stiff to prevent panel flexing under normal handling conditions, a frame would have to be constructed to house the panel.
Your panel is now ready for use.
To calculate your power output, simply multiply the power output of each cell used by the number of cells. For instance, 36 of the 12.5 cm cells producing 2.5 watts each provides a power output of 90 watts, whereas the 15.6 cm cells in a similar configuration will provide (36 * 3.6) = 130 watts output.